Introduction
You finally nailed that perfect yoga pose. But when you check the video, your feet are cut off and the lighting makes you look like a shadow. Sound familiar?Getting your camera yoga setup right is not about owning expensive gear. It is about knowing where to place your camera, how to light your space, and which angles show your poses clearly. Whether you are a yoga teacher building an online class, a student tracking your own progress, or someone curious about camera yoga meaning, this guide covers it all.
By the end, you will know exactly how to set up your camera, choose the best angles, and avoid common mistakes that make yoga videos look messy or unclear. You’ll also find the trade-offs of each setup choice, so you can pick what actually fits your space and budget — for more yoga and flexibility guides, see Hylavita’s Yoga & Flexibility section.
What Does Camera Yoga Mean?
Camera yoga simply means recording your yoga practice on video. It covers everything from filming a quick pose for social media to setting up a full home studio for teaching online classes.
The term also includes camera yoga exercises, which are movements you record to check your form. Many yogis use their phone camera as a mirror. Instead of just watching yourself live, you record and rewatch to spot mistakes in alignment.
Why People Record Their Yoga Practice
There are a few common reasons people turn to camera yoga:
- Teachers want to share classes online or build a YouTube channel
- Students want to check their camera yoga poses for correct alignment
- Fitness creators want to post short clips on Instagram or TikTok
- Beginners want a camera yoga workout log to track flexibility over time
Each of these goals needs a slightly different setup, but the basics stay the same.
Advantages and Disadvantages of Recording Your Yoga Practice
Before you set anything up, it helps to know what you’re trading off. Recording your practice is genuinely useful, but it isn’t free of downsides.
Advantages:
- Lets you catch alignment issues you can’t feel in the moment, especially in poses where you can’t easily see your own body
- Creates a record you can compare over weeks or months to track flexibility and strength gains
- Makes it possible to teach or share your practice without needing a studio
- Encourages more consistent practice, since many people show up more reliably when they know they’re recording
Disadvantages:
- Self-consciousness on camera can distract from breath and focus, especially early on
- Reviewing footage critically can tip into over-scrutinizing your body if you’re not careful with how you frame the exercise
- Setup, lighting, and review all take time you could otherwise spend practicing
- A recording is not a substitute for in-person feedback; camera angles can hide subtle misalignments a teacher would catch immediately
If you already struggle with negative self-talk about your body, treat recorded video as a form-check tool rather than something to scrutinize appearance in, and don’t hesitate to skip it in favor of live instruction when that’s available.
Choosing the Right Camera for Yoga Videos
You do not need a professional camera to start. Most smartphones made in the last few years shoot in high definition, which is good enough for online classes and social posts.
Smartphone vs. Dedicated Camera
| Advantages | Disadvantages | |
|---|---|---|
| Smartphone | Already own it, easy to use, good enough resolution for social and most online classes | Weaker low-light performance, narrower field of view, battery drains faster on long recordings |
| Dedicated camera (mirrorless/camcorder) | Better low-light handling, wider field of view, more control over exposure and focus | Costs more, steeper learning curve, extra gear to carry and charge |
For most home practitioners, your phone is enough. Upgrade only when you outgrow it — usually once you’re teaching regularly or need footage that holds up in low light.
Stability Matters More Than Resolution
A shaky video is far more distracting than a slightly lower resolution. A simple tripod or phone stand solves this problem instantly. Even a stack of books can work in a pinch, though a tripod is safer and more consistent.
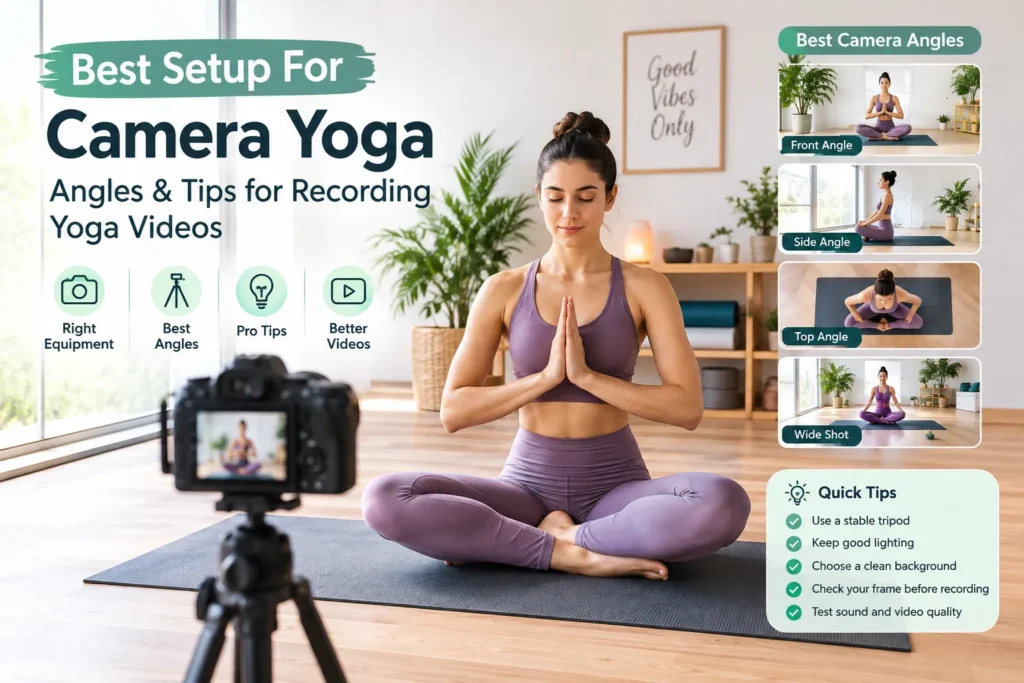
Best Camera Angles for Yoga Videos
Angles make or break a yoga video. The wrong angle can hide your form or cut off important body parts during a pose. Getting the angle right matters for more than aesthetics, too — Mayo Clinic notes that yoga-related injuries sent tens of thousands of people to U.S. emergency rooms over a recent multi-year period, and being able to actually see your alignment on camera is one of the simplest ways to catch a risky position before it becomes a habit (Mayo Clinic).
Full-Body Front Angle
This is the most common setup for yoga videos. Place the camera about 6 to 10 feet away, at chest height, facing you directly. This angle works well for standing poses, sun salutations, and general flow sequences.
Make sure your mat fits fully in the frame. Nothing frustrates viewers more than a video where feet or hands disappear off-screen.
Side Angle for Alignment Checks
If you want to check your spine alignment or hip position, a side angle works best. This is especially useful for poses like downward dog, warrior poses, or backbends, where side-on visibility shows joint angles clearly.
Place the camera at hip height, roughly perpendicular to your mat.
Overhead Angle for Floor Work
For seated or lying poses, an overhead shot adds a nice creative touch. It works well for meditation intros or floor stretches. You will need a tripod with an extendable arm or a wall mount for this angle since handheld overhead shots are hard to keep steady.
Angled Three-Quarter View
A three-quarter angle, somewhere between front and side, is popular on social media. It shows depth and dimension better than a flat front shot. Many fitness influencers prefer this angle because it looks more dynamic and less like a static tutorial.
Lighting Tips for Clear Yoga Videos
Good lighting is often more important than the camera itself. A clear, well-lit video looks professional even on an average phone camera.
Use Natural Light When Possible
Filming near a window during daytime gives soft, even light. Face the window rather than having it behind you, since backlighting turns you into a silhouette.
Avoid Harsh Overhead Lights
Overhead lighting can create unflattering shadows under the eyes and chin. If natural light is not available, use a soft ring light or two lamps placed at angles on either side of you. If you want to go a step further, the classic key-fill-back lighting setup used in film and video production can make a home setup look far more polished — see StudioBinder’s guide to three-point lighting for how the three lights work together.
Keep Lighting Consistent Throughout the Video
If you are recording a longer camera yoga workout, make sure the lighting does not change midway. For example, avoid filming as the sun moves behind clouds or as daylight fades into evening.
Setting Up Your Recording Space
Your background and space matter just as much as your camera settings.
Clear the Background
A cluttered background distracts viewers from your poses. Choose a plain wall or a simple, tidy room. Plants or a yoga-themed backdrop can add warmth without becoming distracting.
Give Yourself Enough Room
Make sure you have space to fully extend your arms and legs without hitting furniture. This sounds obvious, but many first-time recorders set up too close to a wall or table.
Test Your Frame Before You Start
Do a quick trial pose, like a plank or a standing stretch, before recording your full session. This helps you confirm nothing important gets cut off in the frame.
Tips for Recording Camera Yoga Exercises and Poses
Once your setup is ready, a few habits make your recordings look more polished.
Record in Landscape for YouTube, Vertical for Reels
Landscape (horizontal) format suits YouTube and full class videos. Vertical format works better for Instagram Reels, TikTok, and YouTube Shorts. Decide your platform before you hit record.
Use a Remote or Timer
Instead of running back and forth to press record, use a Bluetooth remote or your camera’s built-in timer. This keeps your movements smooth and avoids awkward pauses at the start of the clip.
Do a Few Practice Takes
Your first take is rarely your best. Record two or three run-throughs of your camera yoga poses, then pick the one where your breathing, form, and timing feel most natural.
Check Audio Quality Too
If you are narrating a class, weak audio can ruin an otherwise great video. A basic clip-on microphone improves clarity far more than most people expect, especially in rooms with an echo.
Common Mistakes to Avoid
- Placing the camera too close, cutting off limbs during poses
- Filming with a light source directly behind you
- Forgetting to check battery or storage space before a long session
- Using a shaky handheld shot instead of a stable tripod
- Ignoring background noise like fans, traffic, or pets
Avoiding these small errors instantly improves the quality of your camera yoga videos, even without upgrading your equipment.
FAQ: Camera Yoga Questions Answered
What is the ideal distance between the camera and yoga mat?
A distance of 6 to 10 feet usually works well for full-body shots. This range gives enough space to see your entire pose without the picture looking too far away or too zoomed in.
Do I need a professional camera to start camera yoga videos?
No, a modern smartphone is enough for most beginners and even many online classes. You can upgrade to a dedicated camera later if you plan to teach professionally or grow a larger audience.
What is the best camera angle for beginners?
A straight-on front angle at chest height is the easiest starting point. It works for most poses and does not require extra equipment beyond a basic tripod or stand.
How do I stop my yoga videos from looking shaky?
Use a tripod, phone stand, or even a stable stack of books. Shaky footage almost always comes from handheld filming, so any fixed stand will fix this instantly.
Can I do camera yoga exercises without a teacher present?
Yes, many people record themselves practicing alone, then review the footage afterward to check alignment and form. This is a common and effective way to self-correct without needing a live instructor — though it isn’t a full substitute for in-person feedback, especially if you’re new to a pose or have an existing injury.
Conclusion
A great camera yoga setup does not require a big budget. It just needs the right angle, decent lighting, and a stable camera. Start with a front-facing shot at chest height, use natural light when you can, and always do a quick test take before your full session.
Whether you are recording camera yoga exercises for your own practice or building a full workout series to share online, these small setup choices make a big difference in how clear and professional your videos look.
Try adjusting one thing from this guide in your next recording session, whether it is your camera angle or your lighting setup, and see how much smoother your video turns out. For more practical, evidence-based fitness and flexibility guides, visit Hylavita.
Disclaimer: This article is for general informational purposes only and does not constitute medical or fitness advice. Yoga carries a risk of injury, and camera angles are a self-check tool, not a replacement for guidance from a qualified yoga instructor or medical professional.